

Frequently Asked Questions
The FAQs in this section cover general use of the Testwise platform.
If you do not see the information you need please refer to Troubleshooting FAQs. Here you may find questions about more specific technical issues and how to resolve them.
How do I add more staff logins?
When you want to add a staff member to the Testwise platform you will need to create a new 'User'. See Create Users for information on how to do this.
How do I reset staff passwords?
If a User has problems accessing Testwise, they may need to have their password reset.
To reset a User's password, follow the steps outlined in Reset User Passwords.
What access permissions does a Teacher role have?
If your User role is that of a Teacher, then you will be able to access the following functional areas of the system:
Sittings
Students
Services
Reports
Each of these functional areas is available for you to access from the home screen.
See Understand User Details for more information regarding the different User roles on the Testwise platform.
If you need to change the role of a User, see Change Details of a User and follow the necessary steps.
What access permissions does a School Administrator role have?
If your User role is School Administrator, then you will be able to access the following functional areas of the Testwise system:
Sittings
Students
Subscriptions and Credits
Insights and Reports
Users
Manage School(s)
Each of these functional areas can be found on your home screen.
The School Administrator role has permissions to manage all aspects of Testwise for their school.
If you want to check which role a particular User has been allocated, then view the user details within the 'Edit User' screen. Follow the steps mentioned in the Change Details of a User to access the 'Edit User' screen.
How do I log in if I've forgotten my password?
If you cannot log into the system because you have forgotten your password, see Logging In and follow the steps to reset your password from the Testwise Login screen.
How do I log out?
You can log out of Testwise from any Testwise screen.
Before logging out, you should ensure that you have saved any information you have been working with.
The process for logging out of Testwise is the same as the method that a student would use to log out of the platform once they have completed their assessments.
See Logging Out for the steps required to log out of the Testwise platform correctly.
How do I change my own password?
You can change the password that you use to log into Testwise yourself, whenever required.
See Change My Password for the necessary steps to change your own password.
How do I add our school logo to the front page of Reports?
You can choose which reports contain a logo on the cover page, each time you create a report.
To add a logo, see Define a Logo for Reports and follow the steps to upload a logo to your school's account.
Which assessments can be administered using a tablet?
CAT4, PASS, NGMT, NGRT, and NGST can all be administered using a tablet device as well as a computer.
See Using Tablets for instructions on how to set up your tablet for these assessments.
I'm using a tablet to administer my assessments – what do I need to know?
Please see the the full information on Using Tablets.
We also recommend that you turn of spell-checker and autocorrect as part of your setup process. For information on how to do this, click here.
What should I do if I have duplicate entries in the Students list for the same student?
You should only have one record per student on Testwise. If you have duplicate students in your Students list, you will need to contact your Account Manager for instructions on how to request for the duplicate details to be merged.
See Duplicate Students in Troubleshooting FAQs for additional information regarding duplicated students.
See Merge Students for steps to merge student profiles.
Please note that once duplicated student profiles have been merged, they cannot be retrieved. We advise you to exercise extra caution during this process.
What is a Sitting?
Sittings are used to define which students take which tests and when. Once a sitting has been created and started, each student will be able to log into the Test Lobby and take their assigned tests.
For more information on what a sitting is and how to create one, click here.
What is the Test Start Period?
The Test Start Period is the time range within which a student can start a specific test in a Sitting.
Students can log into the Test Lobby at any time, however, they will not be able to complete tests unless they have logged in within the Test Start Period.
The Test Start Period is defined while creating a sitting using the Sittings wizard.
See Test Start Period for more information.
What is the Test Start Mode?
The Test Start Mode defines the way in which tests are started. You can choose between two different types of Test Start Modes:
Manual Test Start
Automatic Test Start
The Test Start Mode is defined when you create a sitting and can be amended when you change Sitting details.
See Test Start Mode for more information.
What is a Credit?
One credit is required for each student completing a test.
For example, if you have 50 credits, then 50 students can complete one test.
Whenever a student starts a test (by clicking the Start Test button in the Test Lobby), the number of credits available within a subscription will be deducted accordingly. When no credits are available, your school will have to purchase more credits if you want to continue testing students using the Testwise system.
For more information regarding credits, please read the articles on Subscriptions and Credits.
How do I buy Credits?
You can purchase credits from our website or by contacting the Renewals Team.
Contact information can be found here.
What is a Student Access Code?
A student access code is a unique 8-character code that is automatically generated for each student when a sitting is created.
Students enter their access code in the web browser on the 'Access Code Login' screen to access the Test Lobby and view their tests.
For full details of this process, see Using the Test Lobby.
Finding Student Access Codes
Student access codes can be found on the Sitting Progress screen or in the Student Login Details PDF page.
For information on how to find the Sitting Progress screen and view student access codes, see How to View Sitting Progress.
To download student access codes (in CSV or PDF file format), see How to Download Student Login Details.
Distributing Student Access Codes
You can distribute student access codes in a number of different ways.
See How to Distribute Student Login Details for information on the methods of distributing access codes to students.
How do students access and use the Test Lobby?
Students can access the Test Lobby once they have received their access code. The Test Lobby is where students will complete tests and view results.
Please refer to Using the Test Lobby for details on how students can login, use and logout of the Testwise Test Lobby.
Note: Students MUST log out of the Test Lobby in the correct manner, as outlined in the linked article. Failure to do so may result in test results not being recorded by the system. In this case, a student may need to resit the test(s).
Where do I find student login details?
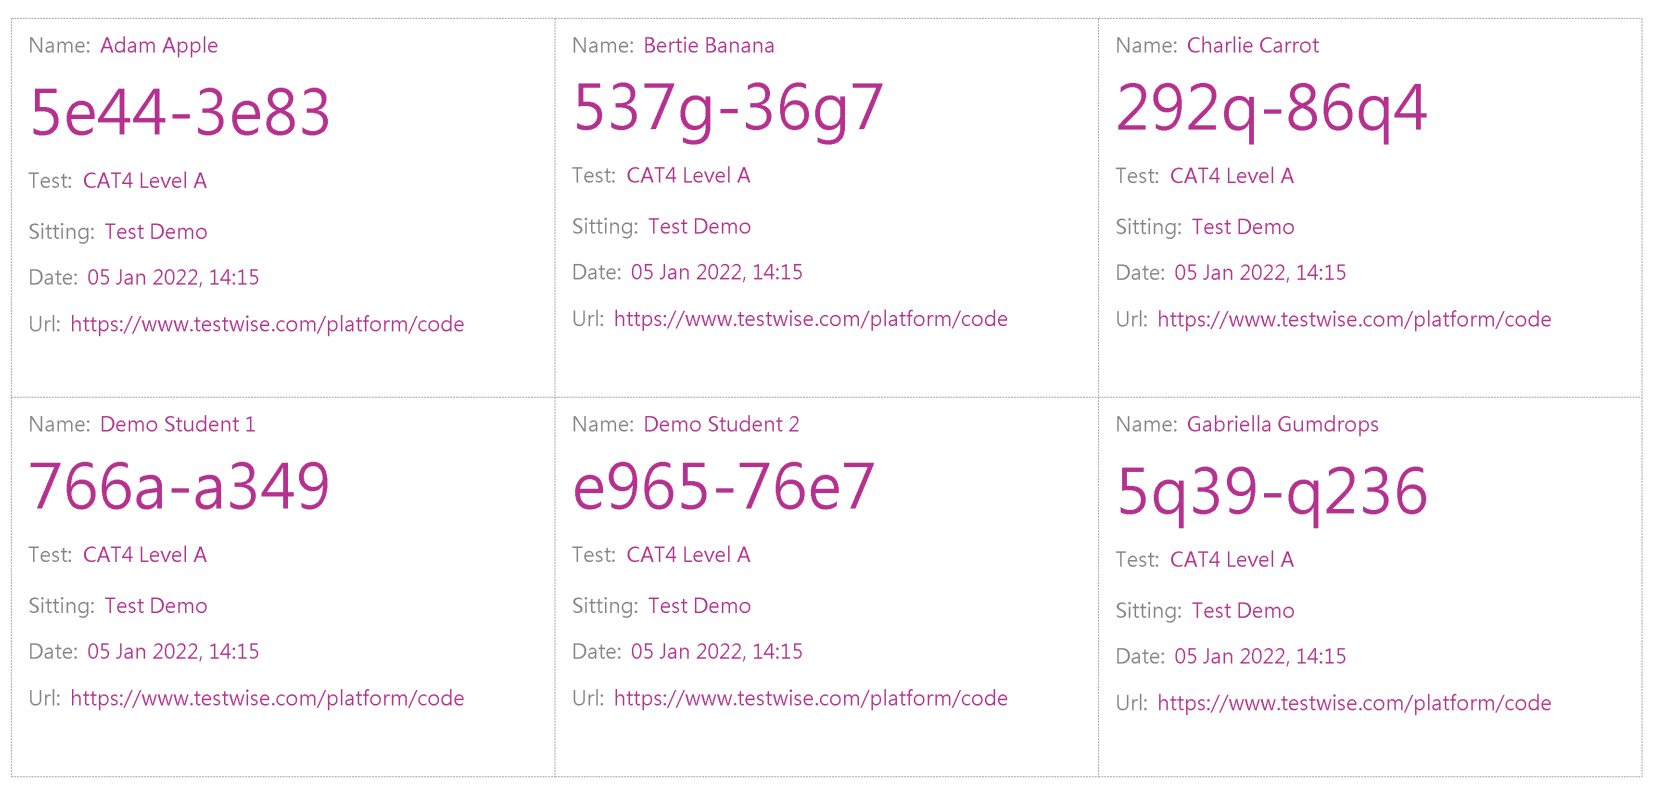
The only login information that a student needs to start their test is their Access Code. These are automatically generated by the platform, and can be downloaded by the User. The downloaded access code(s) contain all the information a student will require to access and complete their assigned test(s).
See Download Student Login Details for all relevant information regarding student login details.
The below image is an example of downloaded access codes for a group of students for a sitting.
Note: Download the access code(s) in the PDF format to view student login details as shown below.
After a sitting is created you can also view student access codes (if necessary) on the Sittings Progress screen.
See Monitor Sitting Progress for information on viewing the access codes of students within a sitting.
Why can't students log in to take their tests?
See Students Cannot Login to Complete Tests in Troubleshooting FAQs for information on how to resolve this issue.
How do I view student progress?
You can view a student's progress in a number of different ways.
See View Student Activity for details on how to view and track student progress.
What does 'Deactivate' mean?
Deactivation is the process of moving older items (or items that are no longer required) to a different location on your system.
You would normally use deactivate if you wanted to reduce the number of items on your screen (within a list), so that you could focus on the current and newer items, which are more relevant to your everyday tasks.
If you keep adding new items to the system, then your lists could become difficult to manage and you might have difficulty finding the items you require.
For example, you might want to deactivate all students who have left the school, at the end of each academic year.
The 'deactivate' function can be used in a number of different areas:
Deactivate Students
Deactivate Sittings
Deactivate Users
When displaying a list of items, you can usually display all deactivated items, by selecting the Show Deactivated Items checkbox (Students/Sittings/Users) above the list of the specific functional area.
The deactivation process is reversible, so you can retrieve deactivated items when they may be required. The process of retrieving deactivated items is known as reactivating.
What does 'Reactivate' mean?
Reactivation is the process of reinstating a previously deactivated item. For example, if you reactivate a student user, then they will reappear in the Students list.
Why can't I see all the information on the screen?
There are a number of reasons why you may not be able to see all the information you require on your screen, even though you are viewing the correct screen.
The reasons include:
1. There is too much information to display on your screen
If you have a large dataset stored within the lists on the Testwise platform, it may be necessary to use the arrows at the bottom of the page to navigate to new pages containing the additional entries.
You can also use the items per page drop-down function to make more items within your lists visible on a single screen. Use this function at the bottom of the page, where you can choose to display up to 100 items per page from the drop-down menu (25, 50, 75 or 100).
Note: You may also use the scroll bar to display more information. If a scroll bar is displayed, then this means that additional information is available to view.
2. You have applied filters
If you have applied filters, then only items that fulfil the criteria you selected are being displayed. Ensure that you have removed any filters so you can view all information.
To remove the applied filters:
Deselect any ticked checkboxes within the filter pane or above the list.
Remove any 'tags' from the filter pane.
3. You have entered text in the Search Bar
If you have entered any text in the Search Bar ![]() , then only items that fulfil the search criteria will be displayed. Ensure that you have deleted all text from the Search Bar in order to view all information.
, then only items that fulfil the search criteria will be displayed. Ensure that you have deleted all text from the Search Bar in order to view all information.
How do I apply filters to a list?
You can apply filters to lists by using the Filter ![]() or by using the filter checkbox above a list to display 'Deactivated' items.
or by using the filter checkbox above a list to display 'Deactivated' items.
The purpose of filtering is to reduce the number of rows of information that are currently visible on your screen, based on specific criteria. Filtering enables you to glean the information you require from a large volume of information, such as a long list of students.
By selecting checkboxes in the filter pane or by clicking the filter checkbox above a list, you can define the criteria for the contents of the list. The checkboxes are sometimes referred to as 'tags', which are visible within the field when they have been applied. Most tags are predefined and are built into your system (e.g. Male or Female). The System Administrator can create custom tags specifically for your organisation, if required.
For example, when viewing the Student list, if you wanted to find Male students who have English as their second language, then you would tick the following checkboxes in the filter pane using the drop-down fields:
Male (in the Gender field).
Yes (in the English as a Second Language field).
The Students list will now display only those male students who have English as their second language.
To filter a list using the Filter pane
Click the Filter
 to reveal the filter pane on the left side of your screen. The filter pane is displayed on some screens that contain lists of items, such as the Students list.
Select the filters that define the criteria for your list. If a scroll bar is displayed in the filter pane, this means there are additional filter options at the bottom of the filter pane that are not currently visible. Scroll down to see these additional options.
As you select each filter, your list will update to include only the items that you want to see.
How do I remove filters from a list?
To remove filters from a list, you can use any of the following methods:
Untick all checkboxes in the filter pane. Also ensure that the Show Deactivated Students/Sittings and Users checkboxes outside of the filter pane are not selected.
Some fields may contain 'tags' when a specific filter has been applied to a list. Removing a tag within the field in the filter pane is equivalent to unticking its checkbox within the field drop-down.
Below is an example of a drop-down field with selected filters which you can deselect and an example of their 'tags' appearing within the field where they were selected.

The above image displays the drop-down options for a specific filter, in this case, the Gender field. As stated above, you can deselect these checkboxes to remove the filter from being applied to the list.

Above is an example of 'tags' which show the applied filters within the field of that specific filter option, in this case the Gender field.
To remove these filters, you can take the actions stated above by unticking the specific filter within the field drop-down or you can click the cross on the 'tag' itself.
Note: 'Tags' are only displayed in certain fields.
Go to a different page in the system and then return to the current page. Each time you open the page afresh, all filtering and searching options will automatically be removed.
How do I search for an item in a list?
You can search any list using the Search Bar ![]() , which is displayed at the top of the list.
, which is displayed at the top of the list.
You can enter words in full or partially in the Search Bar, including numbers.
The columns that are searched will depend upon which list you are viewing. For example, if you are searching the Student list, then the first two columns (Forename and Surname) are searched. Within the Sitting list, only the first column is searched, which contains the Sitting Names.
Searching the Students List
If you want to find all students whose first names and last names contain the characters 'br', then enter br in the Search Bar. Names akin to those of the following students will be displayed:
Olivia Brown
Bradley Green
Bryn Frost
How do I sort a list?
You can sort any list that contains the Ascending/Descending Order Arrows which are found in the column headings. The button will appear when you hover over each column header.
The Ascending/Descending Sort arrow can be in either Ascending Sort mode or Descending Sort mode:
When the button is in Ascending Sort mode, the arrow is highlighted and will point upwards.
When the button is in Descending Sort mode, the arrow is highlighted and will point downwards.
The Ascending/Descending Sort arrow is a toggle button, which means clicking on it once will sort the list in ascending order, clicking it again will sort the list in descending order.
For example, if you want to sort the Students list by Surname, then click on the Ascending/Descending Sort arrow in the 'Surname' column header. Notice that the arrow will now point upwards and remain highlighted next to the column header. The list will now be sorted by Surname in ascending order.
To reverse the order of this column to descending order, click the Ascending/Descending Sort arrow again. The arrow will now point downwards and remain highlighted next to the column header. This list will now be sorted by Surname but in descending order.
To remove the Ascending/Descending Sort mode from the list, click on the arrow once more. The button should now be no longer highlighted and not visible unless you hover over the column header again. The Sort mode will now be inactive and the list will return to its default view.
How do I find out what age and year group each test is designed for?
You can find out what age (and year group) each test is designed for by viewing the Teacher Guidance Pack for that specific test or see our product support pages.
You can also view the Age Recommendation for a test when creating a sitting. When selecting the product for the sitting using the Add Sitting wizard, the right side of the screen will display the recommended ages for the test that you have chosen. See image below for an example.

Note: Some tests will not display a specific age recommendation.
To view more information about the test levels for a selected Product:
Select the required Product in the 'Select Product' field in the Add Sitting wizard.
Click
 on the right hand side of the screen. This will display Age Recommendation screen for the selected Product/Test.
Here you can view information regarding the recommended ages for each Test/Product Level for the selected Product.
If required, click Select Level
 once you have identified the Product Level that you want to use for the sitting.
You will be returned to the Add Sitting wizard and the 'Product' and 'Product Level' fields will now be complete.
Note: You can select the Product and Product Level in the fields in the Add Sitting wizard if information on age recommendation is not required.