

Troubleshooting FAQs
Correct URLs for each Platform
As of April 2025, the platform was upgraded. The correct links to use are shown below:
For teachers: https://www.testwise.com/login
For students: https://www.testwise.com/code
Accessing Student Login on the Same Device that a Teacher/Admin has used to Login
If using the same device to access the account as a teacher/admin, please make sure to logout of the account before accessing the student’s login page.
How to Logout of your Teacher/Admin’s Account:
Click either the Username icon
 or the User's name. This is found on the top right corner of all Testwise pages.
After clicking the Username icon or the User's name, a few options should be available, including the ‘Logout’ button. Click Logout
 to log out of the User's Testwise account.
This will return you to the 'Log into Testwise' page. A student can now login to their assessment from the Teacher/Admin login page.
Click 'Have a student access code?'
 to access the student login page. This can be found underneath the 'Login' button. The Access Code Login page will now be displayed.
The student will click Submit
 once they have entered their unique access code. The student will now enter the Test Lobby where they can complete their assigned assessments.
Invalid Access Code Error Message
If a student sees 'The access code is invalid' message appear when attempting to login, there are a number of common causes:
The wrong access code is being used. This is usually a result of an error when distributing the codes. To check quickly for the correct access code, click Sittings and find the sitting that includes the student. Click View Progress next to the affected sitting and view the Sitting Progress page with the access codes of the participating students. Ask the student to re-enter the access code as it appears in Testwise.
The browser has stored an incorrect URL for Testwise and is reverting to an outdated version on which the access code will not work. Clearing the cache will resolve it if this is the issue.
Website address is incorrect. If the student is in the United States, and the sitting is created outside of the US, this can cause a specific issue. To resolve this please refer to the troubleshooting article 'United States Student Access Code Invalid'.
The Sitting has been closed before the student was able to log in.
United States Student Access Code Invalid
A student taking an assessment in (or appearing to be in) the United States may see 'The access code is invalid' when attempting to login, if that that sitting was created by a user outside of the United States. This is because of data laws within the US, and the requirement for personal information to be housed locally within the country.
Students within the US cannot access sittings created by users outside of the US, and vice versa - sittings created within the US cannot be accessed by students outside of the US.
If a sitting is created outside of the US and the access code sent to someone within the US, that access code will not work.
To resolve this, a sitting must be created in the correct region for the student, or a VPN can be used to alter the perceived location of the computer.
Where to Access Exact From?
Exact has now moved to the new platform so should be accessed on https://www.testwise.com/login.
Where to Access Exact Guidance?
Exact guidance can be accessed here.
How to Enter Values for Typed Dictation, Written Dictation, Upload Evidence and Add Comments for Exact
Click Sittings
 on the Testwise home screen. This will display a list of all existing sittings.
Click View Progress
 on the right of the sitting that you wish to view. This will display the Sitting Progress page where you can see a list of students that were allocated to the sitting.
Click the Edit button
 to the right of each student's name.
Once this button is clicked, the 'Edit Comments' pop-up page will appear. This will allow you to enter comments and values for Typed Dictation, Written Dictation, upload evidence of the written work and add comments for Exact.
Click Save
 to save the comments/values entered for the student's Exact sitting.
Page Down Key Missing in Exact
Students using Exact on a touch screen device may find that there is no option to move down the page, and no 'Page Down' key available. This is because Exact is not compatible with touch screen devices.
Ensure Exact is completed on a desktop or laptop PC using a mouse and keyboard.
For some other devices with low compatibility with Exact (e.g. MacBook, Chromebook) there are key combinations that can replicate the baseline functionality (see your device supplier's recommendations for details) however the core recommendation would always be to use a fully compatible device with Exact.
The two most common devices have the following supplier recommendations for navigating down the page:
MacBook: Fn+Down Arrow.
Chromebook: Search/Alt + Down.
The Different Template Formats Available
The difference between CSV and XLS file formats is that CSV format is a plain text format in which values are separated by commas (Comma Separated Values), while XLS file format is an Excel Sheets binary file format which holds information about all the worksheets in a file, including both content and formatting.
Excel (XLS/XLSX)
CSV
CSV requires a smaller file size when the User is importing data; it is a much faster format compared to Excel. CSV does not manipulate data and stores it as-is. Excel also allows the User the add-in feature. Therefore, should any issues happen when trying to import the template as an Excel file, we advise changing it to CSV and see if the same problem occurs.Legacy Excel (XLS/XLSX)
Legacy CSV
If you have student import templates in the old format and wish to continue using these, download one of the legacy templates listed above.
Differences Between Nationality and Ethnicity when Importing Students
Ethnicity can include several characteristics, such as race, language, and religion. Nationality usually implies that a person is from a specific country, or a territory dominated by a certain ethnic group. Therefore, we have introduced the ‘Nationality’ field to our import templates for schools to be able to differentiate between the two. On our Excel templates, a guidance sheet is contained within that explains which values can be entered for these fields, depending on what values the school has entered prior to the platform upgrade. Set SEND values can also be seen on this guidance sheet.
Example below:

A full copy of this guidance sheet can be found here.
Issue with Import due to Region and Locale (Location) Issues
If Testwise displays the message: 'Your browser language may not match your location, this may affect student imports', it has detected that your internet browser location does not match your geographical location.
It is quite common for internet browsers to default to United States settings. If you are outside of the US but your browser is set to US settings, it causes several issues including errors in student imports. It is important to address the matter if the warning banner is present.
To rectify this issue enter browser settings and update the language settings from English (United States) to your correct local setting, for example English (United Kingdom).
Below is some information on how to change this if validation errors occur:
Change the language of the most popular browsers:
Google Chrome https://support.google.com/chrome/answer/173424?hl=en-GB&co=GENIE.Platform=Desktop
Microsoft Edge https://support.microsoft.com/en-us/microsoft-edge/use-microsoft-edge-in-another-language-4da8b5e0-11ce-7ea4-81d7-4e332eec551f
Mozilla Firefox https://support.mozilla.org/en-US/kb/use-firefox-another-language
Safari https://support.apple.com/en-gb/guide/mac-help/intl163/mac
Change the region settings depending on operating system:
Unique ID Guidance
Unique IDs (Unique Identifier) is the primary field used to sync each student’s profiles to their test results. The value entered must be unique to each student. Normally, schools choose to use a student’s UPN or admissions number, but anything can be entered in the field, as long as it’s unique to each student.
Should a student be already registered on the account and a new Unique ID is entered, then this will create a duplicate profile, rather than updating the information of the current profile for this student. For this reason, it is important to be consistent and accurate when creating a Unique ID, and when uploading datasets to Testwise containing them.
Duplicate Students
You should only have one record per student on Testwise. If you have duplicate students in your Students list, you may need to contact your Account Manager for instructions on how to request for the duplicate details to be merged.
We will provide you with a document to complete, to help us understand which entry should be treated as the master entry and which one needs to be merged. Duplicate student entries may mean that the student testing data is spread across the multiple instances, and this can prevent CAT4 Combination Reports or PT Series Year-on-year Progress Reports from being generated.
Note: Once the duplicate student entries have been merged, it cannot be retrieved, so we advise you to exercise extra caution during this process.
How to Merge Students
Depending on your account permissions, you may be able to merge two or more student profiles if a student has been duplicated on Testwise and there is overlapping data for a single student. This will likely have occurred in error and will need to be resolved as duplicated entries for a single student can influence data used in reports.
To Merge Student Profiles:
Click Students
 on the Testwise home screen. This will display all existing students within the Students list.
Examine the Students list and identify the student profiles that need to be merged.
Select the identified student profiles by clicking the checkbox
 to the left of the student name.
Note: The checkbox will turn purple with a tick  when selected.
Click Merge
 above the Students list. This will display the 'Merge Students' pop-up.
Note: The above example of the Merge button is if two students within the Students lists were selected.
Tick the checkbox of the student who you want to be the 'Primary Student'.
Before selecting your Primary Student, consider the following:
All stored data on completed assessments will be moved into the Primary Student.
All assessments that are in progress will be moved into the Primary Student.
All credits for sittings that are in progress on students that have been merged will be refunded where the Primary Student is also a part of that sitting as long as there are no completed tests.
If a merge occurs where there is a change of Date of Birth and/or Gender then historical results may be rescored.
The student(s) merged into the Primary Student will be permanently deleted and will be unable to be recovered.
Once you have selected the Primary Student:
Confirm that you understand that this action is irreversible.
To proceed, click Merge
 to complete the merging process. The Primary Student will remain in the Sittings list with the data from the merged student(s) now associated with the single existing Primary Student.
How to Update Students' Profiles in Bulk
To update students’ information in bulk, the best way would be to export all the students, update their information on the file type selected and then importing it back onto the website.
To do this:
Click Students
on the Testwise home screen. This will display the Students list.Click Export
 above the Students list and select the required file type:
Excel / Legacy Excel
CSV / Legacy CSV
This will download a file with all the active students on the account, which will need to be updated before importing. Any field can be changed apart from the 'Unique Identifier', as doing so will create duplicate students.
After all the information has been updated and saved to your local system, you may now import the students' file onto the Testwise platform.
Click Add Student(s)
 above the Students list. This will reveal the option to Import Students.
Select Import Students found in the drop-down. This will display the Import Students page.
Click Browse
 and select the file containing the updated student information.
Note: Import warnings and errors can occur here if the updated data has not been inputted correctly. Ensure this is corrected prior to import.
Click Import
 to complete the import student process. The uploaded student profiles with the updated information will now be displayed in the Students list.
Note: For UK customers, Wonde can be used to sync students between your MIS and Testwise to minimise the effort of imports.
How to use the 'Group' field
The 'Group' field contains any student groups that the student may be part of, such as the class name. Certain reports will show a breakdown by this field. Ensure that when you are adding or editing student information, that the information you enter into the 'Group' field is accurate. This is to avoid any errors when searching for students within the Student list or when generating reports based on the groups students are part of.
Note: The 'Group' field is a non-mandatory field.
To Search for Students Associated with a Specific 'Group':
Click Students
on the Testwise home screen. This will display the Students list.
Click the Filter
 to reveal a filter pane, here you can search for students who belong to a specific group by using the 'Group' field.
Note: A grey tag will appear with the group name when selected within the 'Group' field.
You can add, edit or remove the Group(s) associated with the student in the 'Group' field on the Add/Edit Student pages.
Here you can:
Remove groups associated with the student.
Select existing groups for the student to be added to from the drop-down options.
Create a new group for the student to be added to.
This can be done when editing an existing student profile or when you are adding a new student.
Adding a 'Group' to a New Student:
Click Add Student(s)
above the Students list. This will display the available options to add students to the Students list.Select Add Single Student from the drop-down options. This will display the Add Student page.
In the 'Group' field, you can choose to add the new student to existing groups or create new groups for the student to be added to.
Click Save
once you have completed filling in the student information, including their associated groups, if required.
Edit a 'Group' of an Existing Student:
Find the student whose associated groups you want to amend and/or edit.
Click Edit Student in the 'Action' column to add a new group or amend a group name. This will display the Edit Student page.
Note: If not immediately visible, click the 'ellipsis' ![]() to reveal all available functions for a student. Select Edit Student.
to reveal all available functions for a student. Select Edit Student.
In the 'Group' field, you can choose to add the student to existing groups or create new groups for the student to be added to. You can also remove them from groups that are currently associated with them.
Note: Students may have multiple 'Group' tags associated with them.
Click Update
 to ensure any changes made are saved for the student profile.
No Services Available When Trying to Create a Sitting
This is most likely caused because either the subscription/product on the account has expired or you’ve used all the available credits on the account.
Test Will Not Start
If a student is shown as logged into a test/assessment/survey but the test itself will not start there is an issue with either 'handshaking' or the download of the test itself. This is most commonly caused by settings or security with the school's IT network, but can very rarely be caused by Testwise.
To understand if the issue is local settings or security, begin by downloading the test in a private browser window (e.g. Incognito Mode/ InPrivate/ Private Browsing). If this is successful, the issue can usually be resolved by clearing the cache of the affected device.
Ascertain if the test downloads on other devices within the school (for example, attempt to download the test using a mobile phone not connected to the school network). If this is successful, the issue is likely to be permissions based, and will require the school's IT administrator to add the Test Player to the 'Allow List'.
Students Cannot Login to Complete Tests
If a student cannot login to take a test the the following should be checked:
Teacher or School Admin Tasks:
Ensure the status of the sitting is displayed as 'Live' or 'Started' in the Sittings list.
Check the status of the student to ensure that another student has not used the same Access Code.
Check the student's activities within Testwise.
Student Tasks:
Ensure the student has been given the correct Access Code.
Ensure the student has a copy of the Test Taking Instructions for Students and has followed all steps correctly.
Ensure the student has entered the correct web address and typed the Access Code in correctly. Email both the web address and Access Code to ensure that there are no typing errors or type them into their device yourself.
What Happens When a Sitting Expires?
When a sitting expires or is closed, one of two things will happen for each student individually:
If they have not started the test at all, you will be reallocated that credit which you can then use on another sitting.
If they have partially completed the test, they will be given an extra 30 days to complete the sitting using the same access code.
In situation 1, you will need to create new sittings using the re-added credits and distribute new access codes.
In situation 2, if these 30 days pass you would need to use a new credit and create a new sitting to start from the beginning again.
How to Enable Autoplay when Using an Apple MacBook
For students using Apple Macbooks, they will need to ensure that autoplay is enabled for https://www.testwise.com as well as pop-ups.
Below are instructions on how to do this:
Click on Safari > Preferences on the top menu.
Click on the Websites tab at the top.
Click on Auto-Play in the left column.
In the section to the right called 'Allow websites below to automatically play media:' choose Allow All Auto-Play.
Test Stuck in Marking
Occasionally, a student's results take longer than usual to populate. Where this occurs, the student may be missing from the subsequent reporting or may show as 'Marking' in the Sitting Progress tab within Testwise.
Where a test has been completed and marking is taking longer than usual, a button will automatically appear within the Sitting Progress tab for the student marked 'Set to Complete'. This is found in the 'Status' column.
Click Set to Complete
 and after a minimum of 15 minutes, the student's results should be available for reporting.
In the event that this does not resolve the issue, contact Customer Support.
Note: There is a 15 minute delay on results processing.
Marking Status for Sittings
If a test or subsection of a test is showing as ‘Marking...’, then this means that the results were most likely saved, but for some reason the marking process wasn’t completed. In most cases the students will not have to retake the assessment, although you will need to contact Tech Support for an investigation to be done. Only then will we be able to confirm if a student needs to retake their test.

The status of a sitting can be checked by following the instructions here.
Error Sending Results
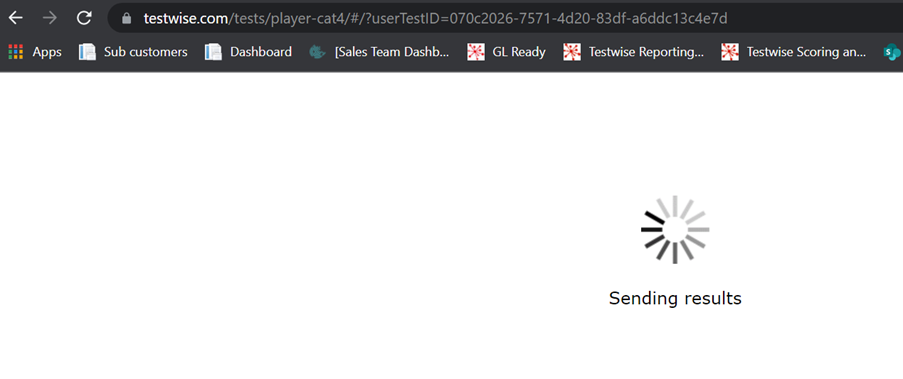
Normally at the end of a test or part of an assessment, this is when the results are sent to us and then saved on the system. On rare occasions, if the minimum system requirements aren’t being fully met or the school’s network/firewall prevent the results to be sent, one of two things will occur:
The page will buffer for a few minutes and then an error sending results will appear on screen with instructions of what to do.
The buffering of the page continues indefinitely.
Scenario 1:
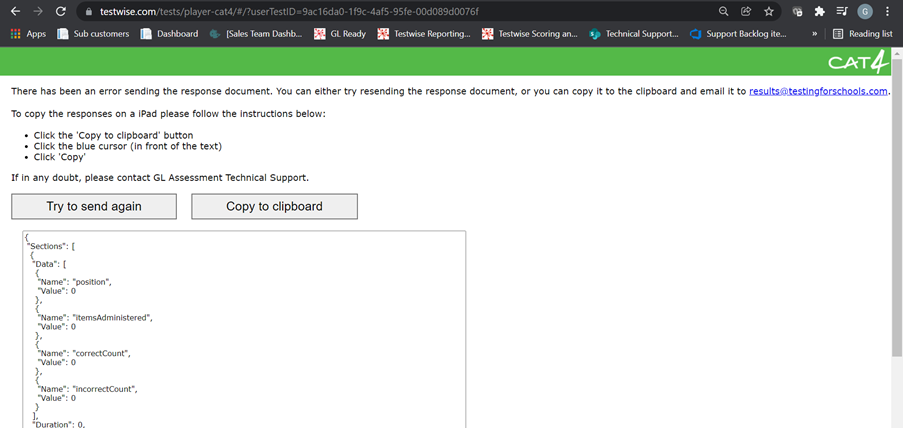
Press the ‘Copy to clipboard’ button and email us the code data along with the school name, postcode and assessment name.
This is so we can verify which account and platform to upload the results into. The clipboard function is a built-in feature of the device you’re using, which lets you temporarily copy text and images from one place to another. This is normally used with the following keyboard shortcuts:
Ctrl+C – to copy data from the current program.
Ctrl+V – to paste copied data into a different application.
Scenario 2:
Unfortunately, in this instance, the only solution is to refresh the page, as it seems that the test player has either timed out or gotten stuck. Doing this means that the student will need to retake the full test or section of the assessment that this happened on.
Ability to Create Reports for Deactivated Students
If students have been deactivated on the account, you’re still able to select these students when creating reports and choosing which students you want to include.
This can be done by ticking the Include Deactivated Students  checkbox during the student selection process.
Note: The checkbox will turn purple with a tick when selected.
What Happens if the Internet Stops Working During a Test?
If there is an interruption to online connectivity during a test, the student will be able to carry on with the assessment. If no internet connection is established by the time the student attempts to end the test and send the results to us, the notification 'Error Sending Response Document' will appear (see image below).
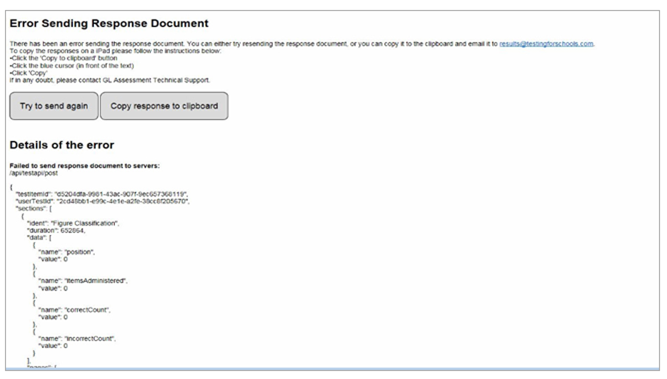
Instructions will be displayed that either the student or invigilator should carefully follow to preserve the student's test results. This will send the test code data and the student's results will be manually applied to the correct account. Ensure that the students are clear that they must not select any of the displayed options themselves.
Occasionally, this issue can occur with no loss of connection. Where this is the case, it is typically because the minimum system requirements are not met or the school network/firewall are preventing the results being sent.
This often causes the page to buffer before displaying an error message, or cause the page to buffer indefinitely. It will require a local IT administrator to ensure that GL products and online sites are added to the school's 'Allow-List'.
In the event that an error message is displayed, Click the Copy response to clipboard button and email us the code data along with the school name, postcode and assessment name. This is so we can verify which account and platform to upload the results into.
Unfortunately, in the instance that the page buffers indefinitely, the only solution is to refresh the page. This will mean that the student will need to retake the full test or section of the assessment in which this error occurred.
What Happens if the Power Goes Out During a Test?
If the device used to take a test loses power during a test (for example there is a power outage or a laptop runs out of charge) the student will need to retake the whole assessment or section of the test they were on, if the assessment has more than one section. This is because no results will be saved and the test/section will restart from the beginning.
Note: Students should use the same access code when restarting the test/section.
What Happens if a Sitting isn't Completed Correctly?
If the student didn’t log off correctly or logged out too early, then it’s most likely that no results were saved, the test status will say ‘In Progress’ and the student will need to retake the whole assessment/section from the beginning.
What Happens if a Student did not Complete the Test Properly/Skipped Questions Therefore Giving an Unreliable Result?
If an Invigilator suspects that a student's test results appear to be inaccurate or unreliable, this can indicate one of two issues:
The student used the wrong Access Code to access the test and the student who sat the test is not the student whose name appears against the results.
The student did not make a sincere attempt to undertake the test / assessment, for example selecting random answers or skipping questions. A short finishing time is a good indicator of this.
It will be necessary to speak to Customer Support to discuss available options. Depending on the situation, we might reallocate a credit on the account so that a new sitting can be created for the student if we deem this to be appropriate.